Wednesday, December 31, 2025

Mastering TRIM and EXTEND

The Yin and Yang of CAD Editing

There are two commands in AutoCAD that account for a massive percentage of your drafting time. They are the chisel and the hammer of the digital drafter. I am talking, of course, about TRIM and EXTEND.

Most novices treat these as two separate tools. They type TR to cut a line. Then they hit Escape. Then they type EX to lengthen a line. Then they hit Escape again. To a Sorcerer, this is wasted motion. It is a break in the flow.

The truth is that TRIM and EXTEND are not two commands. They are two sides of the same coin. If you master the hidden toggles and selection methods, you never have to leave one to use the other.

The Shift Key Toggle

This is the single most important shortcut for geometry editing. If you take nothing else away from this blog, take this.

When you are in the TRIM command, holding down the SHIFT key turns it into EXTEND.

When you are in the EXTEND command, holding down the SHIFT key turns it into TRIM.

It is that simple. I typically sit in the TRIM command by default. I select my cutting edges (or hit Enter to select all), and I start cutting away the excess linework. Suddenly, I see a line that falls short of the wall. I do not cancel the command. I simply hold down Shift, click the line to shoot it forward to the boundary, release Shift, and keep trimming.

This turns a "stop-and-go" process into a fluid, continuous stream of editing.

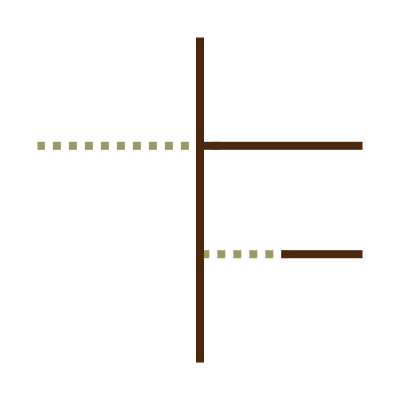
The Implied Fence: slashing Through the Noise

Old School users remember typing F for "Fence" to draw a multi-segment line that trimmed everything it touched. In modern AutoCAD (specifically the "Quick Mode" introduced a few years ago), this behavior is now implied.

You do not need to click individual lines one by one. That is tedious. Instead, click in an empty space and drag your cursor across the objects you want to modify. It creates a "path" or a sketch line. Anything this path crosses gets trimmed (or extended if you are holding Shift).

It acts like a sword slash. If you have twenty parallel lines that need to end at a specific vertical line, do not click twenty times. Click once, drag a path through all twenty ends, and watch them disappear in unison.

Trimming as an Eraser

There is a specific behavior in the TRIM command that often confuses new users, but it is a powerful feature for cleaning up drawings.

Traditionally, you can only trim an object if it intersects a cutting edge. However, the modern iteration of the command is smarter. If you select an object to trim, and that object does not touch a cutting edge or boundary, AutoCAD assumes you want it gone entirely.

It treats the "Trim" action as an "Erase" action. This is incredibly useful when cleaning up messy imported drawings. You can slash through loose, floating geometry that isn't connected to anything, and AutoCAD will simply wipe it out. You do not need to switch tools to ERASE or DELETE. Just keep the trim command active and clean the slate.

Blocks are Boundaries Too

Finally, do not forget that Blocks and Xrefs are valid boundaries.

You do not need to draw a temporary line over the edge of a complex block just to trim against it. If you need to extend a line to the edge of a chair symbol or a complex mechanical assembly, the EXTEND command recognizes the linework inside that block as a valid wall.

This applies even if the block is on a locked layer (though you cannot trim the block itself, obviously). Use the geometry that is already there. Let the complex objects do the work for you.

Conclusion

Stop treating TRIM and EXTEND as separate entities. They are the left and right hands of the same body. Keep your left hand on the Shift key, keep your right hand on the mouse, and stop hitting Escape.

Tuesday, December 9, 2025

The Secret "Array" Hidden Inside the COPY Command

If you ask most CAD users how to create a row of fence posts or a line of evenly spaced bolts, they will likely point you toward the ARRAY command. It makes sense. It is in the name. In modern AutoCAD, the Array command creates a complex, associative object that allows you to tweak spacing later.

But sometimes, you do not want a complex object. Sometimes, you just want ten copies of a block in a straight line, and you want them now. You do not want to open a dialog box. You do not want to navigate a Ribbon tab. You certainly do not want to have to "Explode" an array object later just to edit one specific item.

This is where the Old School method shines. Did you know the standard COPY command has a built-in Array function? It is right there in the command line, hiding in plain sight.

How to Unleash the Copy Array

The next time you run the COPY command (or CO / CP if you have your aliases set up correctly), watch the command line prompt after you pick your base point.

The sequence goes like this:

  1. Select your object.
  2. Type COPY.
  3. Pick your Base Point.
  4. STOP. Do not click your second point yet.

Look at the command line. You will see a prompt that says:

Specify second point or [Array] <use first point as displacement>:

Type A and hit Enter.

Now, AutoCAD asks you for the Number of items to array. Note that this number includes your original object. So, if you have one fence post and you need nine more, you type 10.

Two Ways to Control the Spacing

Once you have entered the number of items, you have two distinct ways to place them. This is where the magic happens.

1. The "Second Point" Method (Default)

This acts exactly like a normal Copy operation, but it repeats the distance. If you move your cursor 5 units to the right, AutoCAD will place the second item 5 units away, the third item 10 units away, the fourth item 15 units away, and so on.

Use this when: You know exactly how far apart the items need to be (e.g., "I need columns spaced exactly 12 feet apart").

2. The "Fit" Method

This is the option people miss. After you type A and enter your number of items, look at the command line again. You will see an option for [Fit].

Type F and hit Enter.

Now, your cursor controls the position of the very last item in the set. AutoCAD will automatically calculate the math and squeeze the other copies evenly between your start point and your cursor.

Use this when: You know the start and end points, but you do not want to do the math on the spacing (e.g., "I need 5 balusters to fit exactly between these two posts, whatever that distance is").

Why Use This Over the Array Command?

I use this method constantly. It creates individual, independent objects rather than a "Block-like" Array group. It is faster than opening a menu. It keeps your hands on the keyboard and your eyes on the geometry.

It is just another example of why reading the Command Line prompts is the most powerful skill a CAD Wizard can possess.

Tuesday, December 2, 2025

The Command Line, The Sidebar, and The Ribbon's Curse

I do not wear the "Old School" badge because I am drowning in nostalgia. I wear it because I learned to draft when the screen was black, the text was green, and the mouse was often just a paperweight. I cut my teeth on AutoCAD back when it lived on MS-DOS and Unix systems. It was a raw, unforgiving environment, and it was fast. We did not hunt for cute little pictures of what we wanted to do. We typed commands. We hammered the keyboard. We used the sidebar menu. We worked at the speed of thought, not the speed of a cursor drifting across a sea of icons.

When the Windows version eventually landed, the ground shifted. The sidebar vanished and was replaced by rows of gray buttons. The toolbars had arrived. I grumbled. We all did. But I adapted. The toolbars were static. They sat exactly where you put them and never moved. You could memorize the location of a button like you memorize the fretboard of a guitar. My hand learned the distance, my eyes stayed on the geometry, and I became a wizard of the toolbar interface.

Then the industry lost its mind and gave us the Ribbon.

I turned it off immediately. I still turn it off. The very first thing I do on any fresh install is hunt down the variable to kill that ribbon and reclaim my monitor. In CAD, the drawing area is sacred ground. Every pixel of that black void belongs to the geometry, not to a bloated UI panel that thinks it knows better than I do. The Ribbon squats at the top of the screen like a landlord. It eats up vertical space and forces me to pan and zoom when I should not have to.

Speaking of the void, we need to talk about the background color. Modern AutoCAD installs do not give you black anymore. They give you a murky, apologetic dark grey. It looks like a chalkboard that has not been washed in a week. It offends me. The moment the Ribbon is dead, I dive into the display settings and scorch the earth. I do not want the "dark theme." I want the abyss. I set the 2D model space, 3D parallel, and perspective modes to pure 0,0,0 black. When I stare into the monitor, I want to see the lines and absolutely nothing else.

I do not stop at the background. I ruthlessly hide every single default toolbar Autodesk ships with the software. My screen is not a billboard for features I do not use. Once the slate is clean, I fire up my personal plugin. I wrote this tool to bypass the generic migration settings and force the system to behave. It summons exactly four custom toolbars. One anchors North, one South, one East, and one West. They frame the drawing area like the crosshairs of a scope. These are not generic buttons. They are the heavy hitters, the custom routines I built to save myself from typing the longest strings. Four bars. The rest is the Void. If I need something obscure, I go to the menu bar. Otherwise, the screen belongs to the model.

Once the visual noise is dead, I attack the input methods. I turn on Dynamic Input with AutoComplete instantly. This might sound contradictory for a command-line junkie, but it is actually the ultimate evolution of it. It brings the prompt to the cursor. I do not have to look down at the bottom of the screen. The machine listens to me right where I am working.

But I do not stop at simply turning it on. I rig the deck. I refuse to accept the default prediction logic. I hunt down the AcCommandWeight.xml file, a text file that controls the brain of the autocomplete system, and I edit the weights manually. By default, the system sees "C" and thinks "CIRCLE." That is wrong. When I type "C," I want "COPY." So I force "COPY" to the top of the stack. I ensure "CIRCLE" sits in second place, and I make sure "CAL" stays out of my way. I do not let the software guess what I want. I tell it what I am going to want.

And I make sure it listens to the real commands. I open the acad.pgp file, the holy scroll of shortcuts, and I gut it. I comment out nearly everything. I do not want L to mean Line unless I say so. I want to type the command names. I want the purity of the language. I keep a tiny handful of personal aliases, but otherwise, I wipe the slate clean. It forces a deliberate interaction with the software that the hunt-and-peck crowd will never understand.

My plugin handles most of this heavy lifting now, but I still have to tweak things manually here and there. As I get deeper into .NET development, I will eventually automate the rest of it. I want a single button that transforms a fresh install into my personal dojo in seconds.

Some people might look at this setup and think I need an intervention. They might be right. I am addicted to customization. I cannot leave well enough alone. I am a perfectionist, and even the Windows operating system must bend the knee. The taskbar must be on the side, so I use Windhawk to force it there. The desktop right-click menu is a mess, so I use NileSoft Shell to rewrite it.

It goes deeper. I have custom Middle Mouse Button menus that act as my personal command center. I use them as application launchers. I use them to change text case, wrap strings, insert timestamps, and drop in special symbols. I know I am crazy. I know that if anyone else sat at my workstation, they would be completely lost. They would stare at the screen and not know how to open a web browser. I cannot help myself.

To be honest, the only rope tying me to the Windows operating system is AutoCAD (and other 3D modeling apps). If Autodesk ever decided to release a native version for Unix or Linux, I would format my hard drive that afternoon. I would wash my hands of the Ribbon, the grey backgrounds, and the user-friendly chaos, and go back to a system that respects the command line as much as I do.

Monday, September 1, 2025

X, Y, Z Filters

Here is a small routine that filters a point by modifying one of its coordinates (X, Y, or Z) based on user input. The function retrieves the last point used in AutoCAD and then prompts the user to select a new point. Depending on the 'xyz' argument, it creates a new point by combining coordinates from the two points:


  • "X": Uses the X from the new point, Y and Z from the last point. 
  • "Y": Uses the Y from the new point, X and Z from the last point. 
  • "Z": Uses the Z from the new point, X and Y from the last point. 
The resulting point is passed to a command. It can (and should) be used transparently.
(defun f:filter-pts ( xyz / P1 P1x P1y P1z P2 P2x P2y P2x )
  (setq P1  (getvar "lastpoint")
        P1x (car P1)
        P1y (cadr P1)
        P1z (caddr P1)
        P2  (getpoint (getvar "lastpoint"))
        P2x (car P2)
        P2y (cadr P2)
        P2z (caddr P2)
  )

  (cond
    ((= xyz "X")
      (vl-cmdf "non" (list P2x P1y P1z))
      
    )
    ((= xyz "Y")
      (vl-cmdf "non" (list P1x P2y P1z))
      
    )
    ((= xyz "Z")
      (vl-cmdf "non" (list P1x P1y P2z))
    )
  )
)
(defun c:FILTER_X nil (f:filter-pts "X"))
(defun c:FILTER_Y nil (f:filter-pts "Y"))
(defun c:FILTER_Z nil (f:filter-pts "Z"))